This post may contain affiliate links. Please see my disclosure policy for details.
The Ultimate DIY Rustic Wedding Dessert Table: A Sweet Symphony of Nature and Nostalgia
Hey there, fellow lovebirds and dessert enthusiasts! Ready to create a dessert table that’ll have your guests swooning (and sneaking seconds)? Let’s dive into the world of rustic wedding charm, where Mother Nature meets sugar-coated bliss.
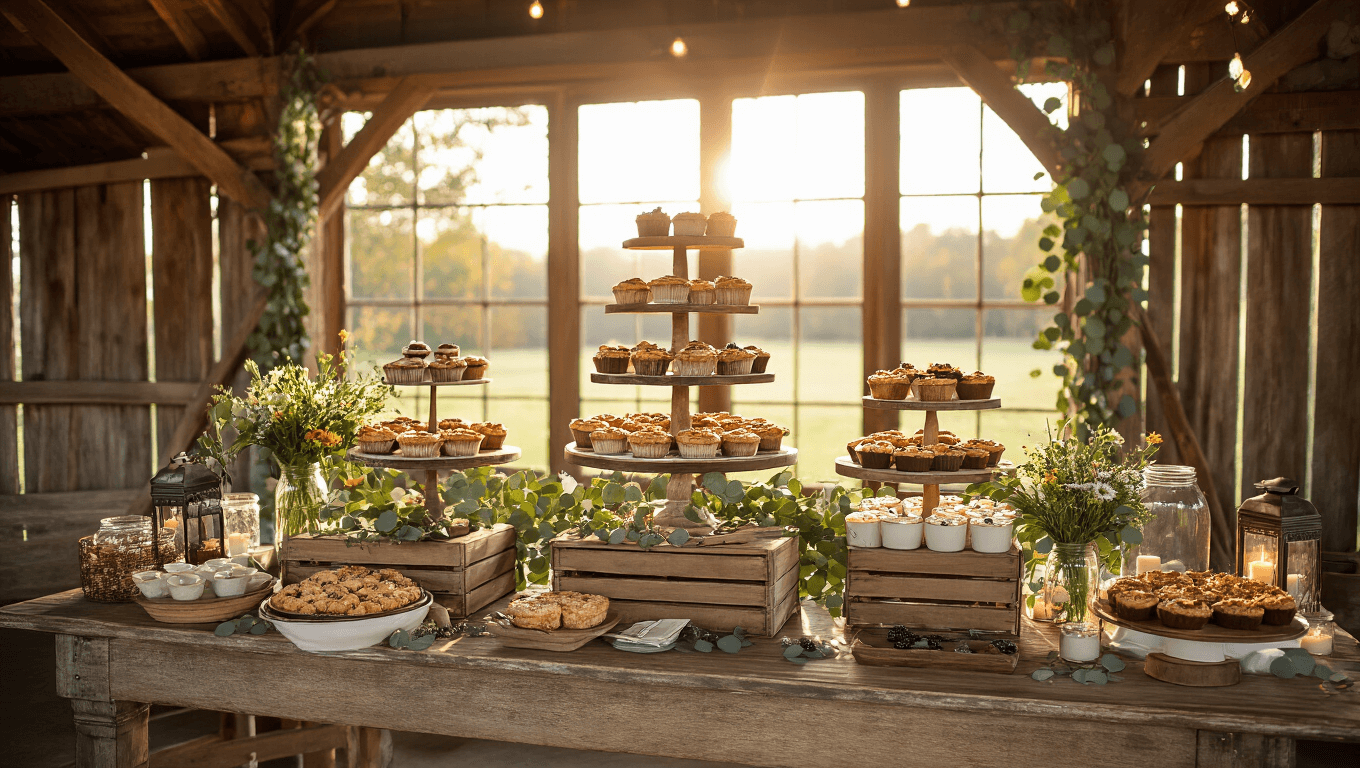
Setting the Stage: The Table of Your Dreams
First things first, we need a showstopper of a table. Forget those boring rental options – we’re going full-on rustic chic here!
- Hunt down a weathered farm table or vintage dresser. Trust me, your local flea market is a goldmine for these beauties.
- No luck? No worries! A few wooden pallets stacked just right can create a jaw-dropping display.
- Pro tip: Open drawers in that dresser to nestle in cookie jars or candy dishes. It’s like a treasure hunt for your sweet tooth!

Layer It Up: Creating Dessert Magic
Now, let’s talk about making those treats pop:
- Wooden everything, my friends. I’m talking log slices, rustic cake stands, even hollowed-out tree stumps if you’re feeling extra woodsy.
- Mix in some height with tiered stands. Wood, metal, whatever fits your vibe – just make sure those goodies are at different levels.
- Baskets and crates are your new best friends. Fill ’em with cupcakes, stack ’em with pies, the possibilities are endless.
The Sweet Stuff: Desserts to Die For
Here’s where it gets really fun. We’re going for that “grandma’s kitchen meets woodland fairytale” vibe:
- Pies, pies, and more pies! Apple, berry, peach – the more homemade-looking, the better.
- S’mores station. Because nothing says “rustic romance” like toasted marshmallows.
- Mason jars filled with mousse or pudding. Add a wooden spoon, and you’re golden.
- Don’t forget your personal favorites! This is your day, after all. If you’re cookie monsters, pile on those chocolate chips!

Nature’s Touch: Bringing the Outdoors In
Let’s soften things up with some green goodness:
- Weave eucalyptus garlands between your dessert stands. It smells amazing and looks even better.
- Sprinkle in some wildflowers. The more “just picked from a meadow” they look, the better.
- Fresh berries or figs scattered about add pops of color and a farmers’ market feel.

Lighting the Way to Dessert Heaven
- Mason jars with tea lights. Classic, easy, and oh-so-cozy.
- Vintage lanterns clustered around. Bonus points if they’re a little rusty.
- If you’re outdoors, string lights overhead for that magical twilight glow.
The Devil’s in the Details
- Wooden or kraft paper signs. “Sweet Treats” or “Indulge” written in swirly chalk font? Yes, please!
- Burlap runners, lace doilies, or even strips of bark to add texture to your table.
- Wooden utensils and kraft paper plates keep that earthy vibe going strong.

DIY Like a Boss
- Hit up thrift stores and yard sales. One person’s trash is your dessert table treasure.
- Enlist your crafty friends. Painting signs or arranging flowers is way more fun as a group activity.
- Prep ahead! Most desserts can be made a day or two in advance. Just add fresh garnishes on the big day.
Remember, the key to a killer rustic dessert table is making it look effortlessly thrown together (even if you spent weeks planning every detail). It’s all about creating a warm, inviting space that makes people want to linger, chat, and sneak just one more cookie.
So go forth, get creative, and most importantly – have fun with it! Your dessert table should be as sweet and unique as your love story. Now, if you’ll excuse me, all this talk of treats has me craving a slice of pie…


")