This post may contain affiliate links. Please see my disclosure policy for details.
Christmas Mug Painting: Festive DIY Fun for Everyone
Contents
Hey there, fellow crafters! It’s that magical time of year again, and I’ve got a jolly little project that’ll have you feeling merry and bright faster than you can say “ho ho ho.” We’re talking Christmas mug painting, folks – a craft so simple and satisfying, even Santa’s elves would be jealous.
Now, I know what you’re thinking. “Me? Paint? I can barely draw a stick figure!” But trust me, this isn’t about creating a museum-worthy masterpiece. It’s about having fun, getting creative, and maybe ending up with a cute little gift or two along the way.
So, grab your ugliest Christmas sweater, pour yourself some eggnog (or hot cocoa if you’re feeling fancy), and let’s dive into the wonderful world of Christmas mug painting!

✎ Steal This Look
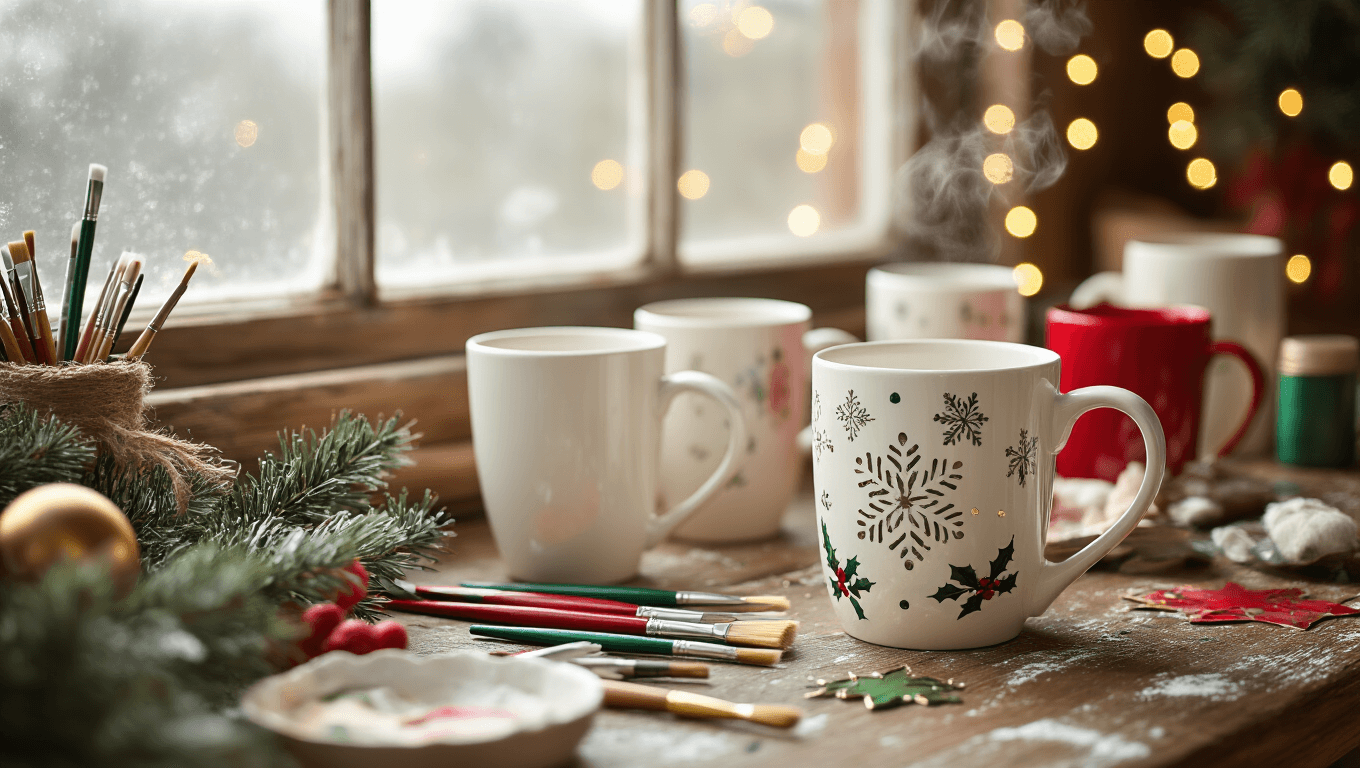
- Paint Color: Sherwin-Williams Alabaster SW 7008
- Furniture: rolling craft cart with locking wheels for portable supply storage
- Lighting: adjustable architect’s desk lamp with daylight LED bulb
- Materials: butcher block work surface, galvanized metal supply caddies, cork trivets for cooling painted mugs
This is the craft room where holiday memories get made, not perfection—embrace the wobbly snowmen and lopsided trees because those handmade mugs become the ones everyone fights over at Christmas morning coffee.
Holly Jolly Designs for Every Skill Level
First things first, let’s talk designs. Whether you’re a complete novice or a seasoned pro, there’s a festive mug idea with your name on it:
- Holly Berries & Leaves: Nothing says “Christmas” quite like a sprig of holly. Paint some green leaves, dot on some red berries, and voila! Instant holiday cheer.
- Snowman: Who doesn’t love a jolly snowman? Two black dots for eyes, a carrot nose, and a scarf – easy peasy!
- Christmas Lights: Bright, colorful, and oh-so-festive. Just don’t try to plug them in!
- “Let it Snow” Lettering: Channel your inner calligrapher and write out your favorite holiday phrase.
- Gold Polka Dots: For when you want to feel fancy but don’t want to put in too much effort.
- Watercolor Christmas Scenes: Get artsy with some soft, dreamy holiday imagery.
- Stencil Designs: Perfect for those of us who struggle to draw a straight line.

★ Steal This Look
- Paint Color: Benjamin Moore Chantilly Lace OC-65
- Furniture: small farmhouse-style kitchen table for mug painting sessions
- Lighting: adjustable-arm brass desk lamp for detailed brushwork
- Materials: raw ceramic bisque mugs, porcelain paint markers, kraft paper drop cloths
There’s something deeply satisfying about wrapping your hands around a mug you painted yourself, especially when the holly leaves came out better than you expected and the cocoa tastes sweeter for it.
✅ Get The Look
Tools of the Trade
Now, before you start slapping paint on mugs willy-nilly, let’s talk about what you’ll need:
- Paint pens or markers: These babies are a godsend for detail work.
- Stencils: For when you want that professional look without the professional skills.
- Acrylic or ceramic-safe paints: Make sure they’re food-safe, unless you want your hot cocoa to taste like art supplies.
- A clean mug: Obvious, I know, but you’d be surprised how many people forget this step!
- Rubbing alcohol: To clean the mug before painting. Trust me, it makes a difference.
- An oven: For curing your masterpiece (check your paint’s instructions for specifics).

💡 Steal This Look
- Paint Color: Farrow & Ball Drop Cloth No. 283
- Furniture: vintage wooden drafting table with adjustable height
- Lighting: swing-arm architect’s lamp with daylight LED bulb
- Materials: raw linen drop cloths, unfinished pine tool caddies, galvanized metal paint cup holders
There’s something deeply satisfying about a well-organized creative corner where every tool has its place—this is the kind of workspace that makes weekend craft sessions feel like a ritual rather than a chore.
Personalization Station
Here’s where the real fun begins. Let’s make these mugs as unique as Aunt Edna’s fruitcake recipe:
- Add names or initials: Nothing says “I definitely didn’t forget to buy you a gift” like a personalized mug.
- Mix and match patterns: Stripes, plaids, florals – go wild!
- Play with texture: Raised dots, bumpy paint – make it fun to hold.
- Experiment with color schemes: Classic red and green, winter pastels, or go full-on disco with metallics.

🖼 Steal This Look
- Paint Color: Behr Polar Bear 75
- Furniture: IKEA KALLAX 4-cube shelving unit as a dedicated mug display and painting supply organizer
- Lighting: Brightech LightView Pro LED magnifying clamp lamp for detailed brushwork
- Materials: unfinished ceramic bisque mugs, porcelain paint pens, dimensional fabric paint for texture, kraft paper roll for protective workspace covering
This is the space where holiday memories get made—expect paint splatters on the tablecloth and laughter over lopsided snowmen, because the best gifts come with fingerprints and stories attached.
Practical Tips (Because We’re Responsible Adults)
- Clean your mug with rubbing alcohol before painting. It’s like flossing – not fun, but necessary.
- Let each color dry before adding the next. Unless you’re going for that “my toddler helped” look.
- Follow curing instructions carefully. Nobody wants a mug that sheds more than the family dog.
- Check if your finished mug is dishwasher and microwave safe. Save yourself (or your gift recipient) from a sad, melty surprise.
Gift Ideas (Because We’re Thoughtful Adults)
- Pair your mug with some homemade hot chocolate mix. It’s like a hug in a cup!
- Use it as a quirky vase for a holiday table setting. Martha Stewart, eat your heart out.
- Fill it with candy and small gifts for a fun, festive present.
Need Inspiration?
- Hit up Pinterest. It’s like a black hole of craft ideas – enter at your own risk.
- Check out TikTok or YouTube for tutorials. Just try not to get distracted by cat videos.
So there you have it, folks – everything you need to know about Christmas mug painting. It’s fun, it’s easy, and it’s a great excuse to drink more hot chocolate. Now get out there and paint like nobody’s watching!
And remember, even if your mug ends up looking more “abstract art” than “Christmas cheer,” it’s the thought that counts. Plus, there’s always next year to perfect your technique. Happy painting!


[…] Everyone told me to paint everything white. […]