This post may contain affiliate links. Please see my disclosure policy for details.
Small Garden Borders: Transform Your Tiny Outdoor Space with Style and Creativity
Contents
- Small Garden Borders: Transform Your Tiny Outdoor Space with Style and Creativity
- Why Garden Borders Matter in Small Spaces
- Design Strategies for Compact Gardens
- Budget-Friendly Border Materials
- Pro Design Techniques
- Common Mistakes to Avoid
- Quick Border Installation Tips
- Bonus: Instant Border Inspiration
- Final Thoughts
Struggling to make your small garden look amazing? You’re not alone. Garden borders can be your secret weapon to create a stunning, organized outdoor space that feels bigger and more beautiful.

✎ Steal This Look
- Paint Color: Sherwin-Williams Rookwood Dark Green SW 2805
- Furniture: foldable bistro table and two chairs in weathered teak
- Lighting: solar-powered copper string lights with warm white bulbs
- Materials: corten steel edging, river rock mulch, reclaimed brick pavers, weathered cedar trellis
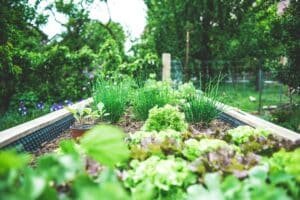
There’s something deeply satisfying about tending a compact border where every plant earns its place—I’ve found that constraints often spark the most creative combinations, and a well-edited small garden rewards daily attention in ways sprawling yards rarely do.
Why Garden Borders Matter in Small Spaces
Garden borders aren’t just decorative—they’re functional magic for tiny yards. They:
- Define planting zones
- Create visual structure
- Make small spaces feel larger
- Add personality to your outdoor area
Design Strategies for Compact Gardens
1. Shape Matters: Curves Create Space
Pro Tip: Curved borders trick the eye into seeing a larger garden. Instead of straight lines, use gentle curves that flow and create movement.

2. Smart Plant Selection
Choose plants that:
- Work well in tight spaces
- Provide year-round interest
- Require minimal maintenance
Top 5 Border Plants for Small Gardens
- Lavender: Fragrant, compact, pollinator-friendly
- Boxwood: Neat, evergreen, formal look
- Alyssum: Soft, low-growing, colorful
- Lamb’s Ear: Unique texture, drought-resistant
- Blue Star Creeper: Spreads beautifully, walkable

✎ Steal This Look
- Paint Color: Farrow & Ball Green Smoke 47
- Furniture: folding bistro set in weathered teak with slender proportions
- Lighting: solar-powered festoon lights with warm 2700K bulbs draped along curved border edges
- Materials: corten steel edging strips, crushed Cotswold gravel, reclaimed brick pavers
There’s something deeply satisfying about a small garden that feels bigger than its boundaries—curved borders reward the slow observer who discovers new views with each step.
Budget-Friendly Border Materials
| Material | Cost | Style | Best For |
|---|---|---|---|
| Cinder Blocks | $ | Industrial | Modern, functional spaces |
| River Rocks | $$ | Natural | Rustic, organic gardens |
| Brick Pavers | $$$ | Classic | Formal, structured designs |
| Metal Edging | $$ | Contemporary | Minimalist landscapes |

🎨 Steal This Look
- Paint Color: Behr Black Mocha PPU5-01
- Furniture: weathered cedar potting bench with galvanized steel top
- Lighting: solar-powered LED bollard lights in matte black finish
- Materials: raw concrete, untreated cedar, galvanized steel, loose river stone, rusted corten steel accents
There’s something deeply satisfying about building garden borders with your own hands using materials that weather beautifully—these aren’t precious installations to fuss over, but hardworking edges that get better with every season of patina and growth.
🌊 Get The Look
Pro Design Techniques
Layering: The Secret to Professional-Looking Borders
- Tall plants in back
- Medium height in middle
- Short, spreading plants in front
Maintenance Hacks
- Mulch generously
- Choose low-maintenance plants
- Plan for mature plant sizes
- Consider wildlife-friendly options

✎ Steal This Look
- Paint Color: use Valspar brand. Match the ACTUAL wall color in the image. Format: Valspar Garden Gate 6005-4C
- Furniture: weathered teak potting bench with galvanized steel top
- Lighting: solar-powered bollard path lights with warm 2700K output
- Materials: cedar mulch, corten steel edging, river rock, aged terracotta
This is where weekend gardeners often trip up—they want instant fullness and cram plants together, but giving your layers breathing room now means you’ll actually recognize your design in three years when everything reaches maturity.
Common Mistakes to Avoid
- ❌ Overcrowding plants
- ❌ Ignoring sunlight/soil conditions
- ❌ Forgetting about seasonal changes
- ❌ Neglecting border maintenance

🖼 Steal This Look
- Paint Color: PPG Sage Splendor PPG1130-5
- Furniture: weathered teak potting bench with galvanized steel top
- Lighting: solar-powered bollard lights with warm 2700K output
- Materials: corten steel edging, crushed gravel pathways, untreated cedar mulch
Small borders demand more editing discipline than large ones—I’ve learned that removing a plant you love is often the kindest thing you can do for the overall composition, and your future self will thank you when you’re not wrestling overgrown specimens every weekend.
Quick Border Installation Tips
- Measure your space
- Sketch a design
- Choose complementary plants
- Prepare soil
- Plant systematically
- Add mulch
- Water consistently

💡 Steal This Look
- Paint Color: use Dunn-Edwards brand. Match the ACTUAL wall color in the image. Format: Dunn-Edwards ColorName CODE
- Furniture: weathered teak potting bench with galvanized steel top for workspace and storage
- Lighting: solar-powered LED path lights with warm 2700K output and automatic dusk sensors
- Materials: natural cedar edging boards, compressed rubber mulch, terracotta clay pots, hemp twine for plant ties
There’s something deeply satisfying about a border that looks like it grew there naturally rather than was plopped in place—take the extra hour to step back and adjust your layout before committing shovel to soil.
Bonus: Instant Border Inspiration
Pro Hack: Follow gardening hashtags on Instagram and Pinterest for endless small garden border ideas. Search #smallgardenborders #gardendesign
Final Thoughts
Creating beautiful garden borders isn’t about having a massive space—it’s about creativity, planning, and smart design. With these strategies, your small garden can become a stunning outdoor sanctuary.
Remember: Every great garden starts with a vision and a few smart choices.
Happy gardening! 🌿🏡