
This post may contain affiliate links. Please see my disclosure policy for details.
Why Stone Garden Beds Are a Game-Changer
Contents
Listen up, because I’m about to drop some serious landscaping wisdom. Stone garden beds aren’t just pretty faces – they’re the superheroes of outdoor design. Here’s why:
Durability That Laughs in the Face of Time
- Virtually indestructible
- Withstands crazy weather conditions
- Looks better with age (like a fine wine)
Visual Drama That Stops Traffic
- Creates instant landscape focal points
- Adds texture and depth to your yard
- Works with virtually any garden style

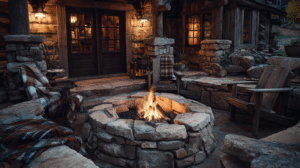
🖼 Steal This Look
- Paint Color: Sherwin-Williams Garden Sage SW 6165
- Furniture: weathered teak Adirondack chair with wide arms for garden edge seating
- Lighting: low-voltage bronze path lights with seeded glass shades to wash light across stone textures
- Materials: thermal bluestone, reclaimed barn wood, crushed pea gravel, drought-tolerant ornamental grasses
There’s something deeply satisfying about a stone bed that outlives every trend cycle—I’ve watched clients fall in love with their gardens twice, once when planted and again when the stones finally weathered into that soft, lichen-kissed patina.
Getting Started: What You’ll Need
Before you dive in, gather these essentials:
Must-Have Tools
- Heavy-duty gloves
- Shovel
- Wheelbarrow
- Level
- Landscape fabric
- Quality garden soil
Pro Tip Budget Breakdown
- Basic DIY project: $400-$600
- Professional installation: $800-$1,500
- Stone type impacts cost significantly

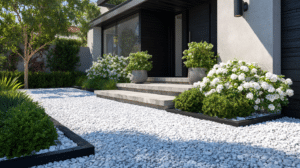
🏠 Steal This Look
- Paint Color: Benjamin Moore Kendall Charcoal HC-166
- Furniture: weathered teak Adirondack chair with organic linen cushion
- Lighting: solar-powered copper path lights with amber LED
- Materials: thermal bluestone, untreated cedar mulch, galvanized steel edging
There’s something deeply satisfying about building with stone; you’re essentially stitching a permanent piece into your landscape that will outlast every trend and probably your mortgage.
Design Considerations: Making It Look Incredible
Stone Selection Matters
- Natural stone colors: Gray, tan, brown
- Mix textures for visual interest
- Consider local stone for authentic look
Style Matching
Perfect for:
- Rustic gardens
- Mediterranean landscapes
- Modern minimalist designs
- Cottage-style yards

✎ Steal This Look
- Paint Color: Farrow & Ball Mouse’s Back 40
- Furniture: low-profile corten steel garden bench with weathered patina
- Lighting: bollard-style LED path lights in aged bronze finish
- Materials: thermal bluestone coping, river rock infill, reclaimed barnwood edging
There’s something deeply satisfying about a stone bed that looks like it emerged from the ground rather than being dropped on top of it—the best ones feel discovered, not installed.
Step-by-Step Construction Guide
Preparation is Key
- Choose your location carefully
- Mark out precise bed dimensions
- Clear and level the ground
- Create a solid, compacted base
Stacking Techniques
- Start with largest, flattest stones at base
- Dry-stack for casual look
- Use mortar for permanent structure
- Ensure each layer is perfectly level

🎨 Steal This Look
- Paint Color: Behr Natural Almond PPU4-12
- Furniture: low-profile teak garden bench with slatted seat
- Lighting: solar-powered copper path lights with warm 2700K output
- Materials: rough-cut limestone, decomposed granite base, organic compost blend
There’s something deeply satisfying about the weight of stone in your hands after hours of planning—this is the section where weekend warriors discover whether they truly love the process or just the finished photograph.
Plant Selection: Bringing Your Stone Bed to Life
Best Plants for Stone Garden Beds
- Succulents
- Alpine plants
- Herbs
- Drought-resistant perennials
Pro Placement Tips
- Consider sun exposure
- Group plants with similar water needs
- Create layers and depth

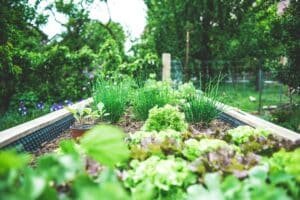
🎨 Steal This Look
- Paint Color: use Valspar brand. Match the ACTUAL wall color in the image. Format: Valspar ColorName CODE
- Furniture: weathered teak potting bench with galvanized steel top for staging and storing garden tools
- Lighting: solar-powered copper path lights with warm 2700K LED bulbs lining the stone bed perimeter
- Materials: rough-hewn fieldstone, aged terracotta pots, crushed limestone mulch, untreated cedar edging
There’s something deeply satisfying about running your hand along warm limestone while snipping fresh thyme for dinner—stone beds age beautifully and become the quiet backbone of your garden that only gets better with time.
Maintenance: Keeping It Looking Spectacular
Quick Maintenance Checklist
- Annual soil refresh
- Check stone stability
- Trim surrounding plants
- Remove weeds promptly

💡 Steal This Look
- Paint Color: PPG Stonehenge Greige PPG1020-3
- Furniture: weathered teak potting bench with galvanized steel top
- Lighting: solar-powered LED bollard lights in matte black finish
- Materials: thermal bluestone edging, crushed limestone base, aged cedar mulch, corten steel garden edging
There’s something deeply satisfying about the ritual of tending a stone garden bed; the way the material weathers and settles over seasons makes it feel like a living part of your landscape rather than just another project to maintain.
Common Mistakes to Avoid
🚫 Don’t:
- Rush the base preparation
- Ignore drainage needs
- Overcrowd your plantings
- Use inappropriate stone types

🌟 Steal This Look
- Paint Color: Dunn-Edwards Sage Wisdom DET620
- Furniture: weathered teak potting bench with zinc top for tool storage and staging plants
- Lighting: low-voltage brass path lights with seeded glass shades
- Materials: thermal bluestone coping, crushed limestone base layer, horticultural grit for drainage, untreated cedar raised bed frames
There’s something humbling about rebuilding a stone bed you rushed—I once watched an entire limestone border heave after one freeze-thaw cycle because I skipped the compacted base, and now I preach the gospel of 4-inch crushed stone with laser-level patience to every gardener I meet.
Final Thoughts
A stone garden bed isn’t just a landscaping feature – it’s an investment in your home’s beauty and functionality. With some planning, creativity, and elbow grease, you’ll create an outdoor masterpiece that’ll make your property shine.
Ready to get started? Your dream garden awaits!
Pro Tip: Take before and after photos. Trust me, you’ll want to show off your incredible transformation.
[…] weeds and maximize every square foot. 🚫 Avoid This: Avoid planting mint directly in garden beds where its aggressive runners will overtake slower-growing perennials; always contain it in sunken […]