This post may contain affiliate links. Please see my disclosure policy for details.
Why Stone Paths Matter
Contents
Let’s be real – a garden without a well-designed path is like a book without chapters. Stone paths:
- Guide visitors through your garden
- Create visual interest
- Define landscape boundaries
- Add value to your outdoor living space

★ Steal This Look
- Paint Color: Sherwin-Williams Garden Sage SW 7749
- Furniture: weathered teak bench with slatted backrest positioned as a destination pause point along the path
- Lighting: low-voltage brass path lights with frosted glass domes spaced 8 feet apart
- Materials: irregular bluestone flagging, crushed limestone fines, moss joints, reclaimed brick edging
There’s something deeply satisfying about the crunch of limestone under your boots at dawn—stone paths age with you, developing character that concrete simply cannot replicate.
Planning Your Stone Garden Path: What You’ll Need
Essential Tools
- Shovel
- Wheelbarrow
- Level
- Sturdy work gloves
- Measuring tape
- Gravel and sand
- Selected stones or pavers
Budget Breakdown
Cost Ranges:
- Budget DIY: $50 – $200
- Mid-range project: $200 – $500
- Professional landscaping: $500 – $1,000+

✎ Steal This Look
- Paint Color: Benjamin Moore Garden Cucumber 644
- Furniture: weathered teak garden bench with slatted back
- Lighting: hammered copper pathway lantern on shepherds hook
- Materials: bluestone flagging, crushed limestone base, polymeric sand joints, moss between stones
There’s something deeply satisfying about a path you’ve laid yourself—every morning walk to the garden becomes a small reminder that you built something lasting with your own hands.
Choosing Your Stone: Style Matters
Stone Types to Consider
- Flagstone: Natural, irregular shapes
- Slate: Smooth, modern look
- River rocks: Organic, rounded appearance
- Concrete pavers: Uniform and predictable
Pro Tip: Mix stone types for a more dynamic, interesting path!

★ Steal This Look
- Paint Color: Farrow & Ball Green Smoke 47
- Furniture: weathered teak garden bench with curved back
- Lighting: low-voltage bronze path lights with seeded glass
- Materials: bluestone flagstone, crushed limestone base, moss joints, aged copper edging
There’s something deeply satisfying about walking a path you laid stone by stone—start small with a side garden section to build confidence before tackling your main walkway.
Step-by-Step Path Creation
Preparation Stage
- Map out your path’s route
- Clear the area of grass and debris
- Dig 2-4 inches deep
- Create a stable base with gravel and sand
Stone Placement Techniques
- Stagger stones for natural flow
- Leave 1-2 inches between stones
- Ensure each stone is level
- Create slight slope for water drainage

🌟 Steal This Look
- Paint Color: Behr Canyon Wind S290-3
- Furniture: weathered teak garden bench with curved backrest
- Lighting: solar-powered bollard lights with frosted glass domes
- Materials: irregular Pennsylvania bluestone, crushed limestone base, polymeric sand joints
There’s something meditative about building a stone path—each placement is a small decision that accumulates into a journey through your garden, and years later you’ll still remember setting certain stones.
Design Inspiration Ideas
Path Style Options
- Curved Wandering Path: Romantic, meandering feel
- Straight Modern Path: Clean, architectural look
- Stepping Stone Design: Minimalist, playful approach

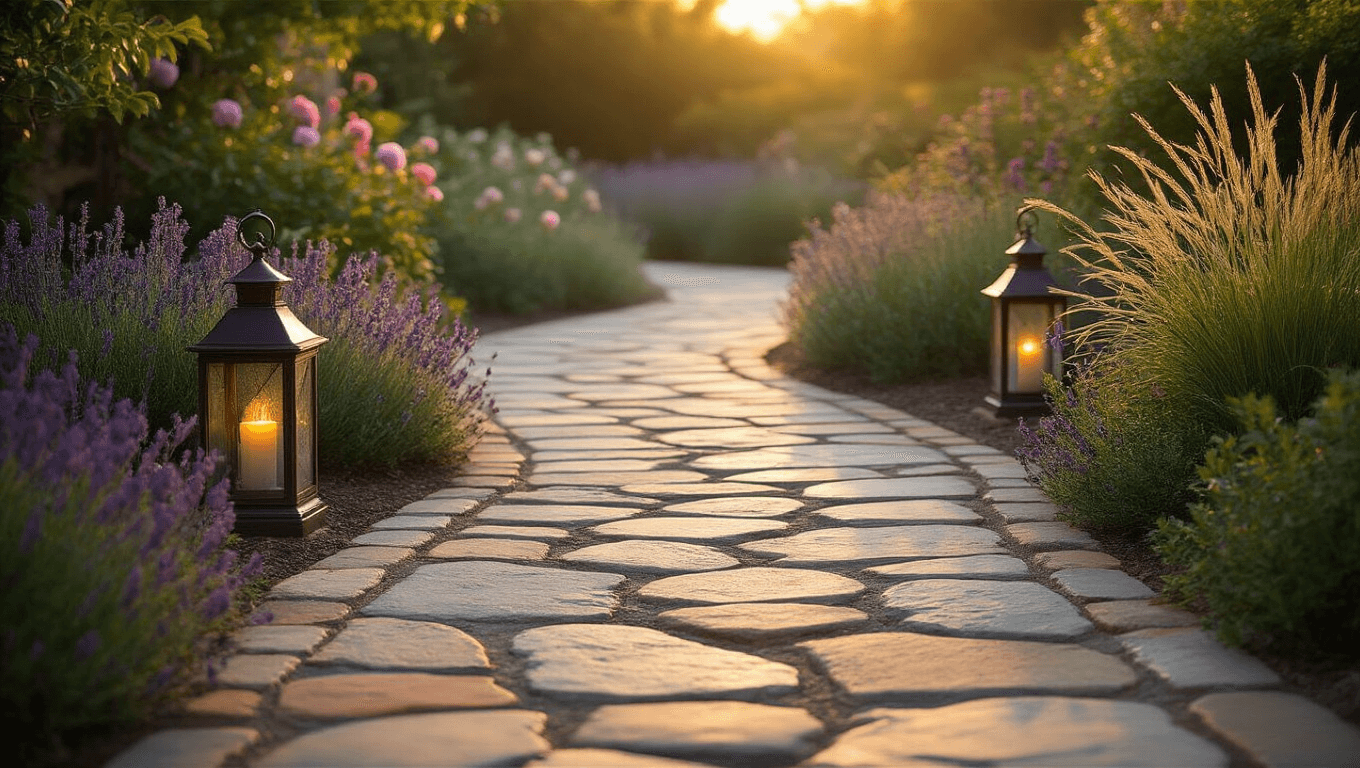
🎨 Steal This Look
- Paint Color: Valspar Garden Stone 4008-3B
- Furniture: weathered teak garden bench with curved backrest, positioned at a gentle bend in the path to create a contemplative pause point
- Lighting: low-voltage brass path lights with seeded glass shades, staggered along curves to cast dappled pools of warm 2700K light
- Materials: thermal bluestone pavers with natural cleft finish, crushed granite fines for joints, massed ornamental grasses for soft edging, reclaimed barnstone for occasional accent boulders
There’s something quietly grounding about a stone path that meanders just enough to hide what’s around the bend—it invites you to slow down and actually notice the garden rather than stride through it.
Maintenance Tips
Quick Care Guide:
- Remove weeds between stones monthly
- Reset loose stones annually
- Top up sand/gravel as needed
- Clean with gentle pressure wash

★ Steal This Look
- Paint Color: PPG Stonehenge Greige PPG1003-3
- Furniture: weathered teak garden bench with curved backrest
- Lighting: solar-powered bollard lights with warm 2700K output
- Materials: thermal bluestone pavers, crushed granite fines, polymeric joint sand, moss accents
There’s something deeply satisfying about a well-kept stone path that invites bare feet on summer mornings—this is the room where your garden becomes a living space.
🌊 Get The Look
Common Mistakes to Avoid
❌ Don’t:
- Skip proper base preparation
- Ignore drainage needs
- Choose stones without considering overall garden style
- Forget about comfortable walking width

🖼 Steal This Look
- Paint Color: Dunn-Edwards Whisper White DEW340
- Furniture: weathered teak garden bench with curved backrest positioned as a visual destination point along the path
- Lighting: low-voltage brass path lights with seeded glass shades installed at 6-foot intervals
- Materials: thermal bluestone pavers, crushed granite base layer, polymeric sand joints, reclaimed brick edging
There’s something quietly satisfying about a path that still sits perfectly level after five winters of freeze-thaw cycles—it’s the difference between a garden that ages gracefully and one that constantly reminds you of shortcuts taken.
Budget-Friendly Hacks
- Use local stone
- Collect stones from construction sites
- Check landscape supply stores for discounts
- Consider mixing high-end stones with more affordable options
Final Thoughts
A stone garden path is more than just a walkway – it’s an extension of your home’s personality. Take your time, plan carefully, and don’t be afraid to get creative!
Pro Designer Secret: The best paths look like they’ve always been there, seamlessly connecting your garden’s different spaces.
Your Next Steps
- Measure your space
- Sketch initial design
- Collect stone samples
- Start your amazing garden path project!
Remember: Every stone tells a story. Make yours extraordinary.