This post may contain affiliate links. Please see my disclosure policy for details.
Our Favorite Budget-Friendly DIY Raised Bed Method
When I first started my garden consulting business, I built every raised bed myself. I’m a gardener, not a carpenter, so I needed a construction method that was simple, sturdy, and didn’t require a garage full of tools. Over time, I perfected an easy system for building wooden raised beds that look great, last for years, and won’t break the bank.
This step-by-step guide walks you through exactly how to build a long-lasting raised garden bed using minimal tools and inexpensive materials. If you’ve been searching for affordable raised garden bed ideas that don’t sacrifice quality, this method will save you time, money, and frustration.
Why I call it the $100 raised bed:
When I first developed this method, the cedar boards, hardware, and framing angles totaled about $100. Cedar prices have risen, so expect to budget slightly more depending on your location, but it’s still one of the most cost-effective raised beds you can build.

What This Guide Covers
Contents
The instructions below focus on building a 4’ x 4’ x 12” cedar raised garden bed, but the same method works for many other sizes. I’ve included easy modifications for these popular options:
- 2’ x 6’ x 12”
- 2’ x 8’ x 12”
- 4’ x 4’ x 6”
- 4’ x 6’ x 12”
- 4’ x 8’ x 12”
Ready to build a beautiful raised bed without overspending? Let’s get started.
Tools You’ll Need
You don’t need fancy equipment for this project.
- Saw (optional, most hardware stores will cut boards for you)
- Pencil and tape measure
- Hand drill
- 1/4″ drill bit (or size that fits your hardware)
- Wrench or bolt tightener
- Framing square (optional, but helpful)
Supplies You’ll Need
For a 4’ x 4’ x 12” raised bed, gather:
- 4 cedar boards, 2″ x 6″ x 8’ (cut into eight 4’ boards) shop here
- 4 metal framing angles, 10″ tall shop here
- 16–24 hex bolts, 1/4″ x 2½” shop here
- 16–24 washers shop here
- 16–24 nuts shop here
Adjust quantities and sizes as needed for different bed dimensions.
Choosing the Right Materials
Best Wood for Raised Beds
Cedar is my top choice because it’s naturally rot-resistant and holds up for years, even in harsh weather. Pine is cheaper, but it typically lasts only a fraction as long.
Important:
Avoid pressure-treated lumber. Chemicals can leach into your soil and contaminate food crops.
I recommend boards that are at least 2 inches thick. Thicker boards mean sturdier beds and a longer lifespan. A 2″ x 6″ x 8′ board offers the best value and flexibility.
Why Use Framing Angles?
Metal framing angles make construction faster and cleaner. They:
- Keep corners square and strong
- Eliminate the need for extra trim boards
- Reduce wear on the wood
Choose framing angles tall enough to support the full height of your bed. For a 12″ tall bed, 10″–12″ angles work well.
Hardware Tips
Use fully threaded hex bolts (not partially threaded). Zinc-coated hardware is food-safe and perfectly fine for garden use. Before buying everything, test one bolt, washer, and nut together to ensure they fit properly.
Step-by-Step: How to Build the Raised Garden Bed
Step 1: Measure Board Thickness
Boards labeled “2 inches thick” are often slightly thinner. Measure the exact thickness and mark that measurement along the inside edge of your boards. This ensures clean, flush corners.
Step 2: Mark Hole Placement
Place a framing angle along your marked line and mark 2–3 bolt holes per side. Make sure each board will be secured with at least one bolt.
Step 3: Drill the Holes
Drill straight through each marked spot. Take your time—accuracy here makes assembly much easier.
Step 4: Attach Framing Angles
Attach framing angles using bolts on the outside and washers and nuts on the inside. You’ll now have completed panels (two boards joined by angles).
Step 5: Build the Corners
Line up new boards against an existing panel, mark holes, drill, and attach. Having a second person to hold boards steady is very helpful.
Repeat this process until you’ve formed a U-shaped structure.
Step 6: Check for Square
Use a framing square to confirm corners are at 90 degrees. Adjust if needed before tightening everything.
Step 7: Attach the Final Panel
Slide the last panel into place, mark holes, drill, and secure it with bolts, washers, and nuts.
Step 8: Tighten All Hardware
Once everything is aligned correctly, tighten every bolt securely.
Your raised bed is now complete!
Installing Your Raised Bed
Before filling your bed with soil, take a few important steps:
Choose the Right Location
Pick a level area with 6–8 hours of sunlight per day.
Level the Ground
Uneven ground can cause soil to wash out and stress the structure. Dig down high spots or add sand or gravel to low areas.
Line the Bottom
- Use weed barrier fabric to block weeds
- Add hardware cloth if burrowing animals are an issue
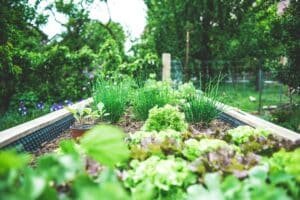
Fill With Quality Soil
Good soil is one of the biggest advantages of raised beds. Use a nutrient-rich garden soil blend and avoid peat-heavy mixes if possible. Once filled, you’re ready to plant. For optimal results in your DIY projects, source a quality blend here that supports healthy growth without compaction.
Raised Bed Size Modifications
Here’s how to adapt this method for other sizes:
4’ x 4’ x 6”
- Two 2″ x 6″ x 8’ boards
- Cut into four 4’ boards
- Use 4″ framing angles
4’ x 6’ x 12”
- Six 2″ x 6″ x 8’ boards
- Cut two to 4’, four to 6’
- Use 12″ framing angles
4’ x 8’ x 12”
- Six 2″ x 6″ x 8’ boards
- Cut two to 4’
- Use 12″ framing angles
2’ x 6’ x 12”
- Four 2″ x 6″ x 8’ boards
- Cut into four 6’ and four 2’ boards
- Use 12″ framing angles
The $50 Raised Bed Option
For shallow-rooted crops like lettuce and herbs, a 6-inch-deep raised bed works beautifully.
- Two 2″ x 6″ x 8’ boards
- Cut into four 4’ boards
- 4″ framing angles
- Shorter bolts
This smaller bed costs roughly half as much and is perfect for salad gardens.

Optional Upgrades
- Add trim for a more polished, furniture-style look
- Use raised bed corners instead of framing angles for faster assembly
- Apply a natural wood treatment to extend the life of the wood
Final Thoughts on Raised Garden Beds
Building your own raised garden bed doesn’t have to be complicated or expensive. With this method, you’ll end up with a strong, attractive bed that lasts for years and produces incredible harvests.
Take a moment to admire your work, you’ve just built a raised bed that supports healthier plants, better soil, and a more enjoyable gardening experience.
Happy growing!